
I have a confession to make. For years, I was terrified of baking bread. The yeast, the kneading, the rising, the precise oven temperatures—it all felt like a science I’d never master. I was convinced that good bread required hours of work, years of experience, and equipment I didn’t have.
Then I discovered this recipe. And everything changed.
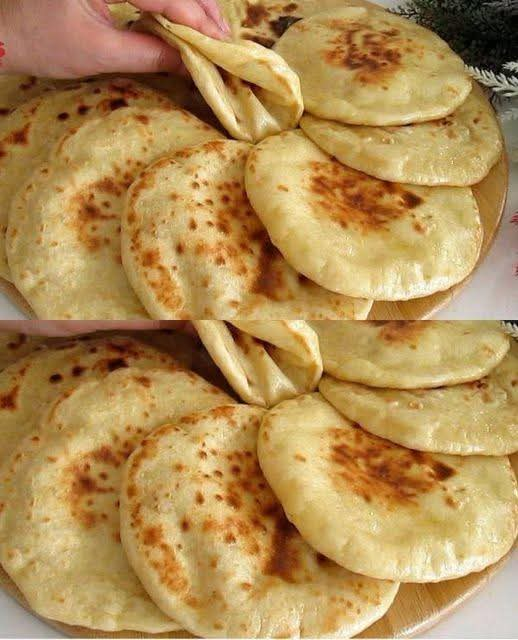
This 10-Minute Skillet Bread isn’t just easy—it’s genuinely the tastiest thing I’ve ever eaten. It’s soft and tender on the inside, with a golden, buttery crust that’s absolutely irresistible. It comes together in minutes with ingredients you already have. And best of all? No oven required.
I first made this on a camping trip when I desperately wanted fresh bread but had nothing but a skillet and a campfire. I threw together a simple dough, cooked it in the pan, and watched in amazement as it puffed up and turned golden brown. The smell alone was enough to draw people from neighboring campsites. And when I tore into that first piece, still warm, and slathered it with butter? Pure magic.
Since then, this skillet bread has become my go-to for busy nights, for camping trips, for when I don’t want to heat up the oven, and for when I need bread right now. It’s foolproof, it’s delicious, and it’s so simple that anyone can make it.
Today, I’m sharing this recipe with you, along with everything I’ve learned about making it perfect.
Why You’ll Love This 10-Minute Skillet Bread
No oven required. All you need is a stovetop and a skillet. Perfect for hot summer days, small apartments, camping, or any time you don’t want to heat up your kitchen.
Ready in 10 minutes. From mixing to eating in under 10 minutes. It’s faster than running to the store for bread.
No yeast, no rising. This bread uses baking powder instead of yeast, so there’s no waiting around for dough to rise. Mix, cook, eat.
Simple ingredients. Flour, baking powder, salt, milk, and butter. Things you probably already have.
Beginner-friendly. If you’ve never baked anything in your life, you can make this bread. It’s truly foolproof.
Delicious warm. The buttery, golden crust and soft interior are absolutely perfect fresh from the skillet.
Versatile. Serve it with soup, use it for sandwiches, eat it with butter and jam, or dip it in olive oil. It works for everything.
Customizable. Add herbs, cheese, garlic, or spices to make it your own.
Budget-friendly. Pennies per serving, maximum deliciousness.
The Complete Ingredient Breakdown
For the Bread:
2 cups all-purpose flour
All-purpose flour gives the perfect texture—tender but with enough structure to hold together. You can substitute up to half with whole wheat flour for a heartier bread.
1 tablespoon baking powder
This is your leavening agent instead of yeast. Make sure it’s fresh—old baking powder won’t give you the rise you need.
1 teaspoon salt
Essential for flavor. Don’t skip it.
1 cup milk
Whole milk gives the richest result, but any milk works. For a dairy-free version, use unsweetened almond, oat, or soy milk.
2 tablespoons butter, melted (plus more for cooking)
Butter adds richness and flavor. You’ll use some in the dough and more for cooking the bread.
Optional Add-Ins:
2 cloves garlic, minced – For garlic bread version
2 tablespoons fresh herbs (rosemary, thyme, chives) – For herb bread
½ cup shredded cheese – For cheesy bread
¼ cup grated Parmesan – For extra savory flavor
1 tablespoon everything bagel seasoning – For everything bagel bread
Step-by-Step Instructions
Step 1: Combine Dry Ingredients
In a medium bowl, whisk together:
· 2 cups flour
· 1 tablespoon baking powder
· 1 teaspoon salt
Whisking ensures the baking powder is evenly distributed throughout the flour.
Step 2: Add Wet Ingredients
Add 1 cup milk and 2 tablespoons melted butter to the dry ingredients. Stir with a fork or spatula until a shaggy dough forms. It will be sticky—that’s correct.
Do not overmix. Stir just until the flour is incorporated.
Step 3: Rest the Dough
Let the dough rest for 2-3 minutes. This allows the flour to fully absorb the liquid and makes the dough easier to handle.
Step 4: Shape the Dough
Turn the dough out onto a lightly floured surface. With floured hands, gently pat it into a round about ¾-inch thick. Don’t knead it—just shape it gently.
Step 5: Heat the Skillet
Place a large skillet (cast iron is ideal) over medium heat. Add about 1 tablespoon of butter and let it melt, swirling to coat the pan.
Step 6: Cook the Bread
Carefully place the dough round in the hot skillet. Cook for 4-5 minutes, until the bottom is golden brown and crispy.
Step 7: Flip and Cook the Other Side
Using a spatula, carefully flip the bread. Cook for another 4-5 minutes on the second side, until golden brown and cooked through. The bread should sound hollow when tapped.
Step 8: Butter the Top
Remove the bread from the skillet and immediately brush the top with additional melted butter. This adds flavor and keeps the crust soft.
Step 9: Cool Slightly and Serve
Let the bread cool for 2-3 minutes before slicing. Serve warm with butter, jam, or your favorite toppings.
The Science Behind Quick Skillet Bread
Baking powder instead of yeast: Baking powder is a chemical leavening agent that releases carbon dioxide when combined with liquid and heat. This creates bubbles in the dough, giving the bread lift without any rising time.
No kneading needed: Because there’s no yeast to develop gluten structure, this bread doesn’t need kneading. Overmixing can actually make it tough, so gentle handling is key.
Skillet heat: Cooking in a hot skillet creates a beautiful golden crust through the Maillard reaction. The even heat of a cast iron pan is ideal, but any heavy skillet works.
Resting the dough: A short rest allows the flour to fully hydrate, which improves texture and makes the dough easier to shape.
Troubleshooting Common Issues
My Bread Is Dense and Heavy
Several possible causes:
· Baking powder was old (test by adding to hot water—it should bubble)
· Overmixed the dough (mix just until combined)
· Dough was too dry (add a splash more milk next time)
My Bread Didn’t Cook Through
Your skillet may have been too hot, burning the outside before the inside cooked. Next time, reduce heat slightly and cook a little longer on each side.
The Outside Burned
Heat was too high. Medium heat is perfect for this bread. If your skillet runs hot, reduce to medium-low.
My Bread Stuck to the Pan
Make sure your skillet is well-buttered before adding the dough. A well-seasoned cast iron pan works best.
The Dough Was Too Sticky to Handle
Use a well-floured surface and floured hands. The dough will be sticky—that’s normal. A light dusting of flour is all you need.
My Bread Is Dry
Overcooked or not enough fat in the dough. Next time, check for doneness at 4 minutes per side and make sure you’re using enough butter.
Delicious Variations
Once you’ve mastered the basic recipe, try these variations.
Garlic Herb Skillet Bread
Add 2 cloves minced garlic and 2 tablespoons fresh chopped herbs (rosemary, thyme, chives) to the dry ingredients. Brush with garlic butter after cooking.
Cheesy Skillet Bread
Add ½ cup shredded cheddar or mozzarella to the dough. Sprinkle extra cheese on top during the last minute of cooking, then cover until melted.
Everything Bagel Skillet Bread
Add 1 tablespoon everything bagel seasoning to the dry ingredients. Brush with butter and sprinkle with extra seasoning after cooking.
Cinnamon Sugar Skillet Bread
Omit the salt and add 2 tablespoons sugar and 1 teaspoon cinnamon to the dry ingredients. Serve with butter and honey.
Jalapeño Cheddar Skillet Bread
Add ½ cup shredded cheddar and 1-2 diced jalapeños to the dough. The spicy, cheesy combination is incredible.
Rosemary Parmesan Skillet Bread
Add 2 tablespoons fresh chopped rosemary and ¼ cup grated Parmesan to the dough. Brush with garlic butter.
Olive and Herb Skillet Bread
Add ¼ cup chopped kalamata olives and 1 tablespoon dried oregano to the dough. Serve with olive oil for dipping.
Sun-Dried Tomato and Basil Skillet Bread
Add ¼ cup chopped sun-dried tomatoes and 2 tablespoons fresh chopped basil to the dough.
What to Serve With Skillet Bread
With butter and jam: The classic. Soft butter and sweet jam on warm bread is perfection.
With soup: The ultimate companion for tomato soup, potato soup, or any creamy soup.
With olive oil and balsamic: Tear off pieces and dip in good olive oil with a splash of balsamic.
As sandwich bread: Slice horizontally and use for sandwiches. It’s especially good for grilled cheese.
With pasta: Serve alongside spaghetti or lasagna to soak up extra sauce.
With eggs: The perfect breakfast bread, toasted and buttered.
With cheese and charcuterie: Tear into pieces and serve on a cheese board.
With honey butter: Mix softened butter with honey and a pinch of salt for the ultimate spread.
Storage and Make-Ahead Tips
Room temperature: Store in an airtight container or wrapped in foil at room temperature for up to 2 days.
Refrigerator: Store in the refrigerator for up to 5 days. Reheat before serving for best texture.
Freezer: This bread freezes beautifully. Wrap tightly in plastic wrap and foil and freeze for up to 3 months. Thaw at room temperature and reheat in a skillet or oven.
Reheating: The best way to reheat is in a dry skillet over medium heat for 1-2 minutes per side, or in a 350°F oven for 5-8 minutes.
Make-ahead for dinner: Make the dough up to 2 hours ahead and keep covered at room temperature. Cook just before serving.
Why This Recipe Is Perfect for Beginners
If you’ve never baked bread before, this recipe is where you should start. Here’s why:
No yeast anxiety. You don’t have to worry about killing yeast with water that’s too hot or too cold. Baking powder is foolproof.
No kneading required. There’s no technique to learn—just mix and shape.
No waiting. From craving to eating in under 10 minutes. Instant gratification.
Simple ingredients. You probably already have everything you need.
Forgiving. This recipe is hard to mess up. Even if it’s not perfect, it will still be delicious.
Instant confidence boost. The first time you make this and pull a beautiful golden bread from the skillet, you’ll feel like a real baker. And you’ll be hooked.
Why This Recipe Deserves a Place in Your Kitchen
This 10-Minute Skillet Bread represents everything I love about simple, accessible cooking. It proves that you don’t need fancy equipment or years of experience to create something genuinely delicious. It’s proof that good food can be fast, easy, and satisfying.
I’ve made this bread on busy weeknights when I needed something quick. I’ve made it camping over a campfire. I’ve made it for friends who couldn’t believe it was made in a skillet. I’ve made it for my kids who devour it warm with butter.
Every single time, it delivers. Every single time, that warm, buttery, golden bread makes everything better.
This recipe has become a staple in my kitchen for good reason. It’s reliable, versatile, and always welcome at the table.
And now it can be that for you too.
So grab that skillet. Measure that flour. Melt that butter. And get ready to make the easiest, most delicious bread of your life.
Your 10-minute journey to fresh, homemade bread starts now.
Have you made this Skillet Bread? What variations did you try? I’d love to hear about your experience in the comments below!
More Recipes You Might Like
-
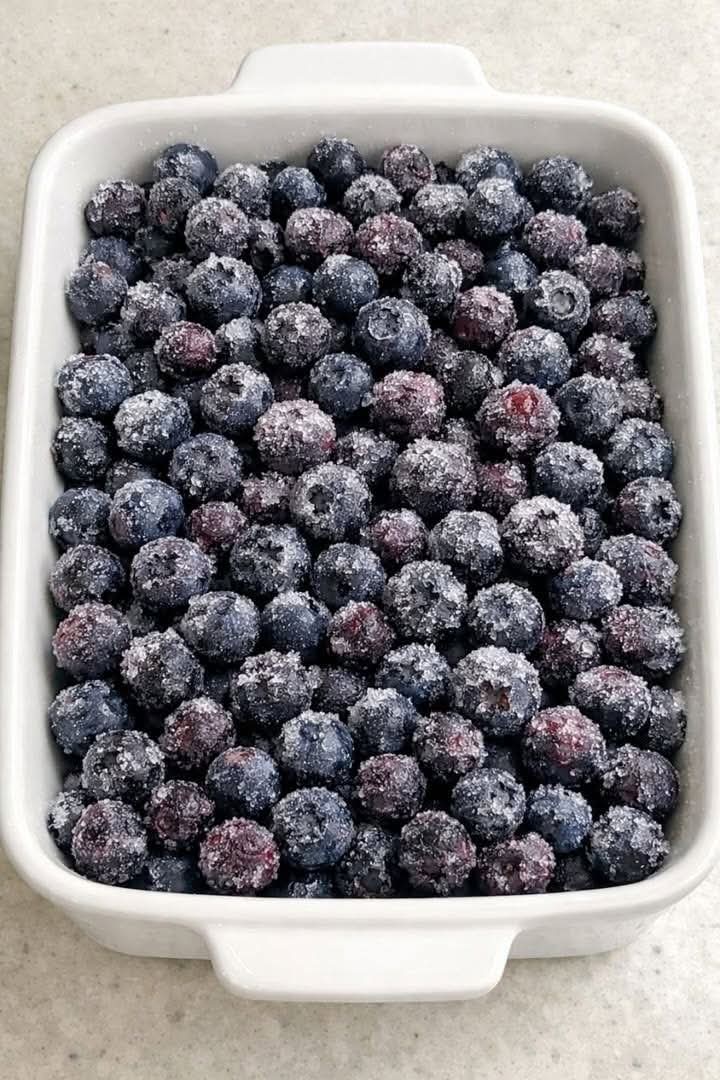
3 Ingredient Blueberry Dump Casserole: The Unbelievably Easy Dessert That Disappears Fast
You don’t need a dozen ingredients, a stand mixer, or complicated steps to create a dessert that will have your husband (and everyone else) going back for thirds. Just dump frozen raw blueberries straight into a casserole dish with three simple ingredients, bake, and watch magic happen. This Blueberry Dump Casserole is a cross between…
-
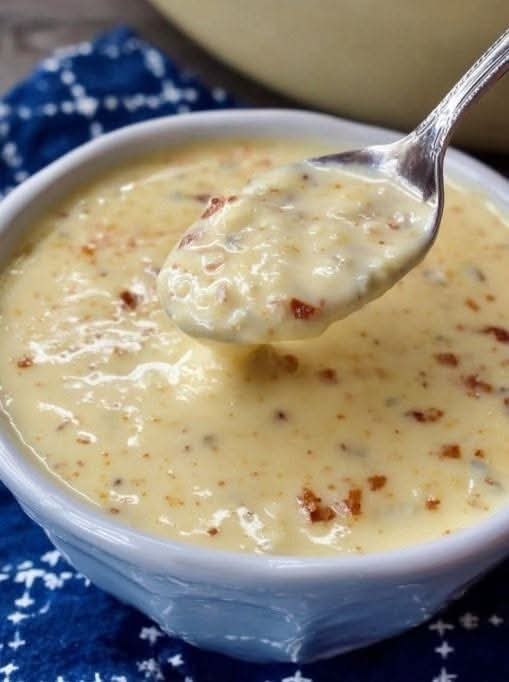
Canadian Cheese Soup: The Velvety, Bacon‑Infused Comfort Classic
When the temperature drops and you crave something deeply satisfying, nothing hits like a bowl of Canadian Cheese Soup. This is not a thin, boxed cheese soup — it’s a rich, lager‑laced, sharp‑cheddar chowder with smoky bacon and a velvety smooth texture that warms you from the inside out. Made famous by the Le Cellier…
-
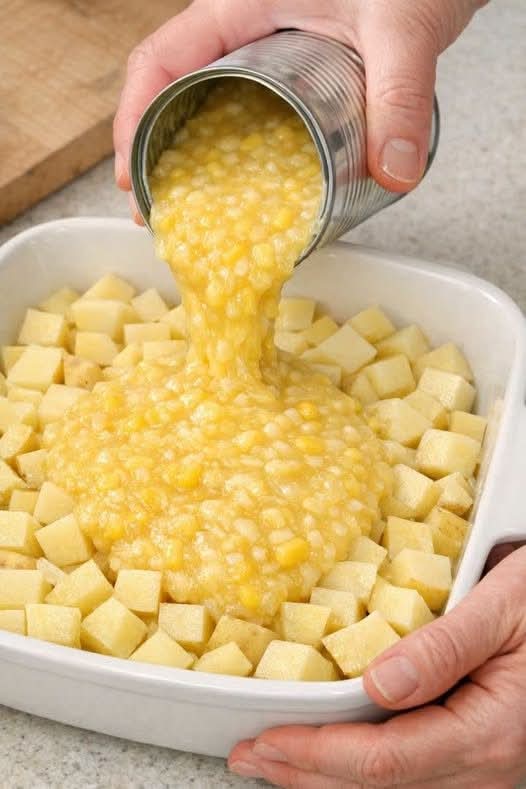
Creamy Corn Potato Casserole: The Side Dish That Disappears Every Time
Some side dishes are forgettable. This one is not. Creamy Corn Potato Casserole is the kind of recipe that earns a permanent spot in your holiday and weeknight rotation. With just a handful of humble ingredients – diced Yukon Gold potatoes, cream‑style corn, and plenty of sharp cheddar – you get a bubbling, golden, spoonable…