

I have a confession to make. For years, I was convinced that good bread required an oven. It seemed obvious, right? Bread comes from the oven. That’s just how it works. So when I first heard about making bread entirely on the stovetop, I was skeptical. Very skeptical.
Then I tried this recipe. And I ate my words along with half the loaf.
This isn’t just good “for stovetop bread.” This is genuinely, honestly, the tastiest bread I’ve ever eaten. It’s soft and fluffy on the inside, with a golden, buttery crust that’s absolutely irresistible. It comes together in minutes with ingredients you already have. And best of all? No oven required.
I first made this on a hot summer day when I couldn’t bear the thought of turning on my oven and heating up the whole house. I had yogurt in the fridge, flour in the pantry, and a desperate craving for fresh bread. I figured I’d give it a try, expecting something edible but unremarkable.
What came out of that skillet was nothing short of miraculous. The bread was beautiful—golden brown, perfectly domed, with a crust that crackled when I sliced into it. The inside was soft, tender, and absolutely perfect. My family gathered around, tearing off pieces before I could even get it to a cutting board.
Since then, this stovetop bread has become a staple in my kitchen. I make it for dinners, for sandwiches, for snacks, for no reason at all except that fresh bread makes everything better. And every single time, people can’t believe it was made on the stovetop.
Today, I’m sharing this recipe with you. Trust me—you need this bread in your life.
Why You’ll Fall in Love With This Stovetop Bread
No oven required. Perfect for hot summer days, small apartments, camping, dorm rooms, or any time you don’t want to heat up your kitchen.
Ready in 10 minutes. From mixing to eating in under 10 minutes. It’s faster than running to the store.
Incredibly soft and fluffy. The yogurt creates a tender crumb that stays fresh for days.
Simple ingredients. Flour, yogurt, water, baking powder, salt, oil. Things you probably already have.
Beginner-friendly. If you’ve never baked anything in your life, you can make this bread. It’s truly foolproof.
No yeast, no waiting. Baking powder does the work, so there’s no rising time. Instant gratification.
Versatile. Use it for sandwiches, toast, dipping, or just slathered with butter.
Budget-friendly. Pennies per loaf, maximum deliciousness.
The taste is unforgettable. Seriously—this might be the best bread you’ve ever eaten.
The Complete Ingredient Breakdown
For the Bread:
4 cups (480g) all-purpose flour
All-purpose flour gives the perfect texture—tender but with enough structure to hold its shape. Measure carefully—too much flour can make the bread dense.
For best results: Spoon the flour into your measuring cup and level it off with a knife. Don’t scoop directly from the bag—that packs in too much flour.
1 cup (220g) plain yogurt
Yogurt is the secret to this bread’s incredible texture. It adds moisture, tenderness, and a subtle tang that makes this bread so delicious. Full-fat yogurt gives the richest result, but any yogurt works.
Why yogurt works: The acidity in yogurt reacts with the baking powder to create extra lift, and the fat and protein create a tender, almost cake-like crumb.
1 cup (200ml) warm water
Warm water helps everything come together smoothly. It should be warm to the touch but not hot—about 100-110°F.
1 packet (10g) baking powder
This is your leavening agent. Make sure it’s fresh—old baking powder won’t give you the rise you need. If you’re not sure, test it by adding a teaspoon to hot water—it should bubble vigorously.
1 teaspoon (8g) salt
Essential for flavor. Don’t skip it—bread without salt tastes flat and sad.
1 tablespoon (10ml) vegetable oil
Oil adds moisture and helps create a tender crumb. You can use any neutral oil—canola, vegetable, avocado, or even melted butter for extra flavor.
Step-by-Step Instructions
Step 1: Combine Dry Ingredients
In a large bowl, whisk together:
· 4 cups flour
· 1 packet (10g) baking powder
· 1 teaspoon salt
Whisking ensures the baking powder is evenly distributed throughout the flour. This is important—you don’t want a pocket of baking powder in one spot.
Step 2: Add Wet Ingredients
Add the yogurt, warm water, and vegetable oil to the bowl.
Stir with a wooden spoon or your hands until a shaggy dough forms. It will be sticky—that’s correct. If it seems too dry, add another tablespoon of water. If it seems too wet, add a tablespoon more flour.
Step 3: Bring It Together
Turn the dough out onto a lightly floured surface. With floured hands, gently bring it together into a ball. Do not knead—just shape it gently. The dough should be soft and slightly tacky but manageable.
Step 4: Shape the Loaf
Pat the dough into a round loaf about 1-inch thick. Don’t make it too thin—you want it to have some height.
Using a sharp knife, score the top with a few slashes. This allows steam to escape and gives the bread a beautiful finished look.
Step 5: Heat the Skillet
Place a large, heavy-bottomed skillet (cast iron is ideal) over medium-low heat. Let it heat up for 2-3 minutes. You want it hot but not smoking.
Step 6: Cook the First Side
Carefully place the dough in the hot skillet. Cover with a tight-fitting lid.
Cook for 5-7 minutes, until the bottom is golden brown and the bread has risen slightly. The steam trapped by the lid helps cook the bread through.
Step 7: Flip and Cook the Second Side
Carefully flip the bread using a spatula. Cover again and cook for another 5-7 minutes, until the second side is golden brown and the bread sounds hollow when tapped.
Step 8: Check for Doneness
The bread should be golden brown on both sides and sound hollow when tapped. If you’re unsure, insert a skewer into the center—it should come out clean.
Step 9: Cool Slightly
Transfer the bread to a wire rack and let it cool for at least 10 minutes before slicing. I know it’s hard to wait, but slicing too soon can make it gummy.
Step 10: Enjoy
Slice and serve warm with butter, jam, or your favorite toppings. Watch it disappear.
The Science Behind Stovetop Bread
Baking powder provides lift. Unlike yeast, which takes time to ferment and produce gas, baking powder creates carbon dioxide bubbles immediately when mixed with liquid. These bubbles expand in the heat, creating a light, airy texture.
Yogurt adds tenderness. The acid in yogurt tenderizes the gluten, creating a softer crumb. It also reacts with the baking powder for extra lift.
Steam cooks the bread. The covered skillet traps steam, which cooks the bread through while the bottom browns. This is the same principle as baking in a Dutch oven.
Low and slow is key. Cooking over medium-low heat ensures the bread cooks through without burning on the outside.
Troubleshooting Common Issues
My Bread Is Dense
Several possible causes:
· Baking powder was old
· Overmixed the dough (mix just until combined)
· Skillet wasn’t hot enough
· Didn’t cook long enough covered
My Bread Is Too Dry
Too much flour. Next time, measure carefully and add a little more water if needed.
The Outside Burned Before the Inside Cooked
Your heat was too high. Next time, reduce to medium-low and cook longer.
My Bread Stuck to the Pan
Make sure your skillet is well-seasoned or lightly oiled. Cast iron works beautifully.
It Didn’t Rise Enough
Check your baking powder freshness. Old baking powder won’t give proper lift.
The Inside Is Gummy
Undercooked. Next time, cook longer covered, and make sure it’s completely cool before slicing.
Delicious Variations
Once you’ve mastered the basic recipe, try these variations.
Garlic Herb Bread
Add 2 cloves minced garlic and 2 tablespoons fresh chopped herbs (rosemary, thyme, chives) to the dry ingredients.
Cheddar Jalapeño Bread
Add 1 cup shredded sharp cheddar and 2 diced jalapeños (seeded for less heat). The combination is incredible.
Everything Bagel Bread
Add 2 tablespoons everything bagel seasoning to the dry ingredients. Sprinkle extra on top before cooking.
Cinnamon Raisin Bread
Add 2 tablespoons sugar, 1 tablespoon cinnamon, and ½ cup raisins. This version is perfect for breakfast toast.
Olive and Rosemary Bread
Add ½ cup chopped kalamata olives and 2 tablespoons fresh rosemary. The briny olives are wonderful.
Sun-Dried Tomato and Basil Bread
Add ½ cup chopped sun-dried tomatoes and ¼ cup fresh chopped basil.
Seeded Bread
Add ¼ cup mixed seeds (sesame, poppy, sunflower) to the dough.
Cheesy Garlic Bread
After cooking, brush with garlic butter and sprinkle with Parmesan. Return to the skillet for 1 minute to melt.
What to Serve With This Stovetop Bread
With butter and jam: The classic. Nothing beats warm bread with good butter.
For sandwiches: Slice horizontally and use for sandwiches. It’s sturdy enough to hold up but soft enough to be delicious.
With soup: Perfect for dipping into tomato soup, potato soup, or any creamy soup.
With olive oil and balsamic: Tear off pieces and dip in good olive oil with a splash of balsamic.
For breakfast toast: Toast slices and top with butter, eggs, avocado, or cinnamon sugar.
With cheese and charcuterie: Serve alongside a cheese board.
As garlic bread: Slice, butter, add garlic, and toast in the skillet.
Storage and Make-Ahead Tips
Room temperature: Store in an airtight container or wrapped in foil at room temperature for up to 3 days.
Refrigerator: Store in the refrigerator for up to a week. Toast slices before serving for best texture.
Freezer: This bread freezes beautifully. Wrap tightly in plastic wrap and foil and freeze for up to 3 months. Thaw at room temperature.
Reheating: The best way to reheat is in a dry skillet over medium heat for 1-2 minutes per side, or in a toaster.
Make-ahead for dinner: Make the dough up to 2 hours ahead and keep covered at room temperature. Cook just before serving.
Why This Recipe Is Perfect for Beginners
If you’ve never made bread before, this is where you should start. Here’s why:
No yeast anxiety. You don’t have to worry about killing yeast with water that’s too hot or too cold. Baking powder is foolproof.
No kneading required. There’s no technique to learn—just mix and shape.
No waiting. From craving to eating in under 10 minutes. Instant gratification.
No oven required. If you don’t have an oven, or don’t want to use it, this recipe is your answer.
Simple ingredients. You probably already have everything you need.
Forgiving. This recipe is hard to mess up. Even if it’s not perfect, it will still be delicious.
Instant confidence boost. The first time you pull this beautiful golden bread from the skillet, you’ll feel like a real baker.
Why This Recipe Deserves a Place in Your Kitchen
This 10-Minute Stovetop Bread represents everything I love about simple, accessible cooking. It proves that you don’t need fancy equipment or years of experience to create something genuinely delicious. It’s proof that good food can be fast, easy, and satisfying.
I’ve made this bread for busy weeknight dinners and for camping trips. I’ve made it for friends who couldn’t believe how easy it was. I’ve made it for my family who now request it by name.
Every single time, it delivers. Every single time, that warm, golden, buttery bread makes everything better.
This recipe has become a staple in my kitchen for good reason. It’s reliable, versatile, and always welcome at the table.
And now it can be that for you too.
So grab that skillet. Mix that dough. Cook that bread. And get ready to taste the easiest, most delicious bread of your life.
Your 10-minute journey to fresh, homemade bread starts now.
Have you made this Stovetop Bread? What variations did you try? I’d love to hear about your experience in the comments below!
More Recipes You Might Like
-
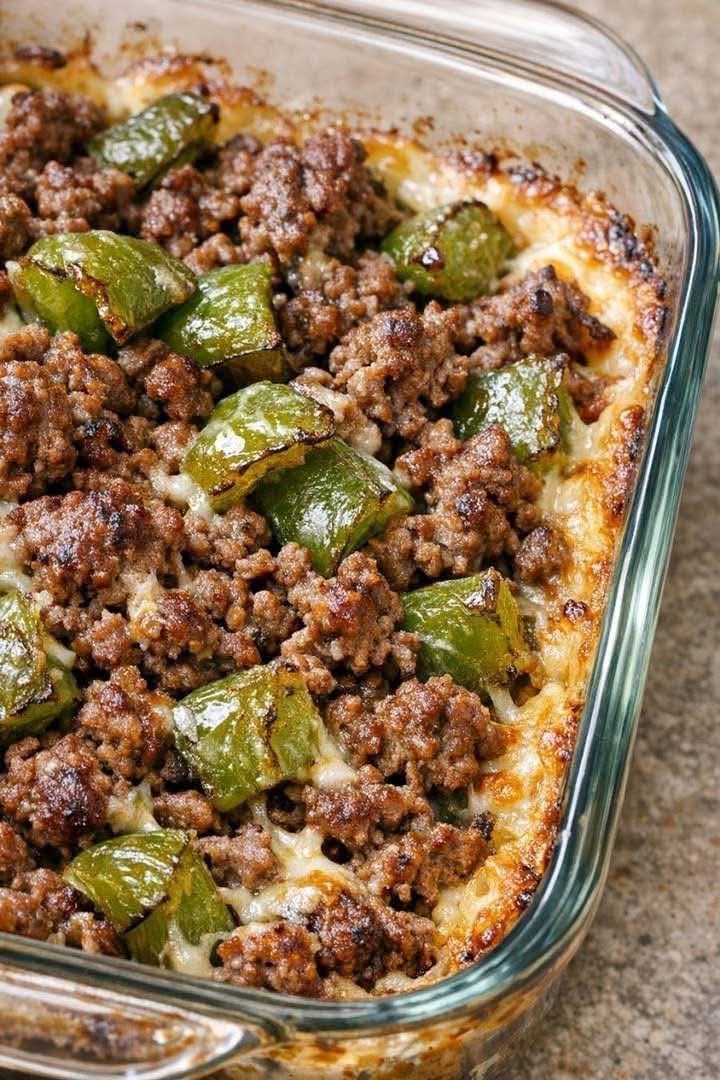
Oven Baked 4 Ingredient Amish Beef and Bell Pepper Bake – The Hearty, No-Fuss Dinner You’ll Make on Repeat
This Amish beef and bell pepper bake uses just 4 ingredients – ground beef, bell peppers, cream of mushroom soup, and onion soup mix. A simple, hearty, oven-baked casserole that tastes like home. Let’s be honest: the best recipes are often the simplest. No fancy techniques, no long ingredient lists, no hours of prep. Just…
-

Layered Sweet Potato Gratin – Creamy, Cheesy, and Absolutely Irresistible
This layered sweet potato gratin is a show‑stopping side dish. Thinly sliced sweet potatoes baked in a creamy garlic sauce with Parmesan and thyme. Perfect for holidays, weeknights, or anytime you crave comfort food. Let’s be honest: sweet potatoes are already amazing. They’re naturally sweet, creamy, and packed with vitamins. But when you layer them…
-

Vegetable Cheese Fritters – Crispy, Cheesy, and Irresistible (Ready in 20 Minutes)
These vegetable cheese fritters are crispy on the outside, tender on the inside, and packed with veggies and melty cheese. A perfect snack, side dish, or light meal – ready in 20 minutes. Let’s be honest: getting kids (and adults) to eat vegetables can feel like a battle. But what if you could hide a…